How to Make Irresistible Peanut Butter Snacks : Quick & Healthy but Energy on Every Bites
The delightful aroma of freshly made peanut butter snacks can transport you to a world of comfort and nostalgia.These quick and healthy bites offer an energy boost with every bite, making them perfect for busy days or as a pre-workout snack.I first encountered this recipe during a family reunion, where the nutty sweetness quickly became a hit among all ages.The combination of creamy peanut butter and crunchy textures creates a snack that’s both satisfying and irresistible.Whether you’re a peanut butter lover or new to these flavors, these snacks promise to delight your taste buds.Join me as we explore how to make these irresistible peanut butter bites that strike the perfect balance between health and indulgence.
The History and Cultural Significance
• Irresistible Peanut Butter traces its origins to the early 20th century in the United States, where it was originally created as a protein-rich food for people without teeth.
• The dish evolved over decades as peanut butter became a popular household staple, eventually becoming the beloved version we know today with the addition of various textures and flavors.
• In American culture, this dish traditionally appears at picnics and school lunches, symbolizing convenience and nourishment.
• While many variations exist across different regions, the authentic version maintains a creamy texture and nutty flavor that sets it apart from imitations.
Recipe Overview
| Recipe Times & Servings | |
|---|---|
| ⏱️ Prep Time: | 10 minutes |
| 🔥 Cook Time: | 0 minutes |
| ⏰ Total Time: | 10 minutes |
| 👥 Servings: | 12 |
Nutritional Information (per serving)
| Nutritional Information (per serving) | |
|---|---|
| 🔥 Calories: | 150 |
| 🥩 Protein: | 5g |
| 🌾 Carbs: | 12g |
| 🥑 Fat: | 10g |
| 🌿 Fiber: | 2g |
| 🍯 Sugar: | 6g |
Essential Equipment Guide
Mixing Bowl: A large mixing bowl is essential for combining ingredients evenly, ensuring a consistent texture throughout the snacks. A metal or glass bowl works best, as it won’t retain odors and is easy to clean.
Spatula: A flexible spatula is crucial for scraping the sides of the bowl and ensuring that all ingredients are well incorporated. Silicone spatulas are ideal due to their heat resistance and durability.
Measuring Cups and Spoons: Accurate measurements are key to achieving the right balance of flavors. Opt for a set that includes both dry and liquid measurements for versatility.
Ingredients
For the Base
| Amount | Ingredient | Notes |
|---|---|---|
| 1 cup | creamy peanut butter | provides the main flavor and texture |
| 1 cup | rolled oats | adds fiber and bulk |
| 1/2 cup | honey | natural sweetener and binding agent |
| 1 teaspoon | vanilla extract | enhances flavor |
Add-ins
| Amount | Ingredient | Notes |
|---|---|---|
| 1/4 cup | chocolate chips | adds sweetness and texture |
| 1/4 cup | chopped nuts | provides crunch and additional protein |
Preparation Methods
Creaming: This technique involves thoroughly mixing the peanut butter and honey until smooth and creamy, which is crucial for ensuring the snacks hold together and have a uniform texture.
Folding: Gently folding in the oats and add-ins prevents them from becoming crushed, maintaining their integrity and providing a satisfying bite.
Chilling: Chilling the mixture in the refrigerator helps it firm up, making it easier to shape into uniform bites.
Step 1: Prepare Ingredients

Gather all ingredients and measure them accurately using measuring cups and spoons.
Set out a large mixing bowl and a spatula for easy mixing.
Ensure that the peanut butter is at room temperature for easier blending.
Chop any nuts or add-ins if necessary to ensure even distribution.
Step 2: Combine Peanut Butter and Honey

Add the peanut butter and honey to the mixing bowl.
Using a spatula, mix them together until they form a smooth, creamy consistency.
Ensure there are no lumps or unmixed areas.
This step is crucial for creating a cohesive base for the snacks.
Step 3: Add Vanilla Extract

Pour the vanilla extract into the peanut butter and honey mixture.
Stir gently to incorporate the vanilla throughout the mixture.
The vanilla adds a subtle flavor that enhances the overall taste.
Ensure it’s evenly distributed for consistent flavor in every bite.
Step 4: Fold in Rolled Oats

Add the rolled oats to the mixture in the bowl.
Using a folding motion with the spatula, gently incorporate the oats.
Avoid over-mixing to maintain the texture of the oats.
This process helps distribute the oats evenly throughout the mixture.
Step 5: Incorporate Add-ins

Add the chocolate chips and chopped nuts to the bowl.
Fold them into the mixture using the spatula until evenly distributed.
Ensure that the add-ins are spread throughout for consistent flavor and texture.
This step adds variety and interest to each bite of the snack.
Step 6: Chill the Mixture

Cover the bowl with plastic wrap or a lid.
Place the bowl in the refrigerator to chill for at least 30 minutes.
Chilling helps the mixture firm up, making it easier to shape into bites.
Ensure the mixture is well chilled before proceeding to the next step.
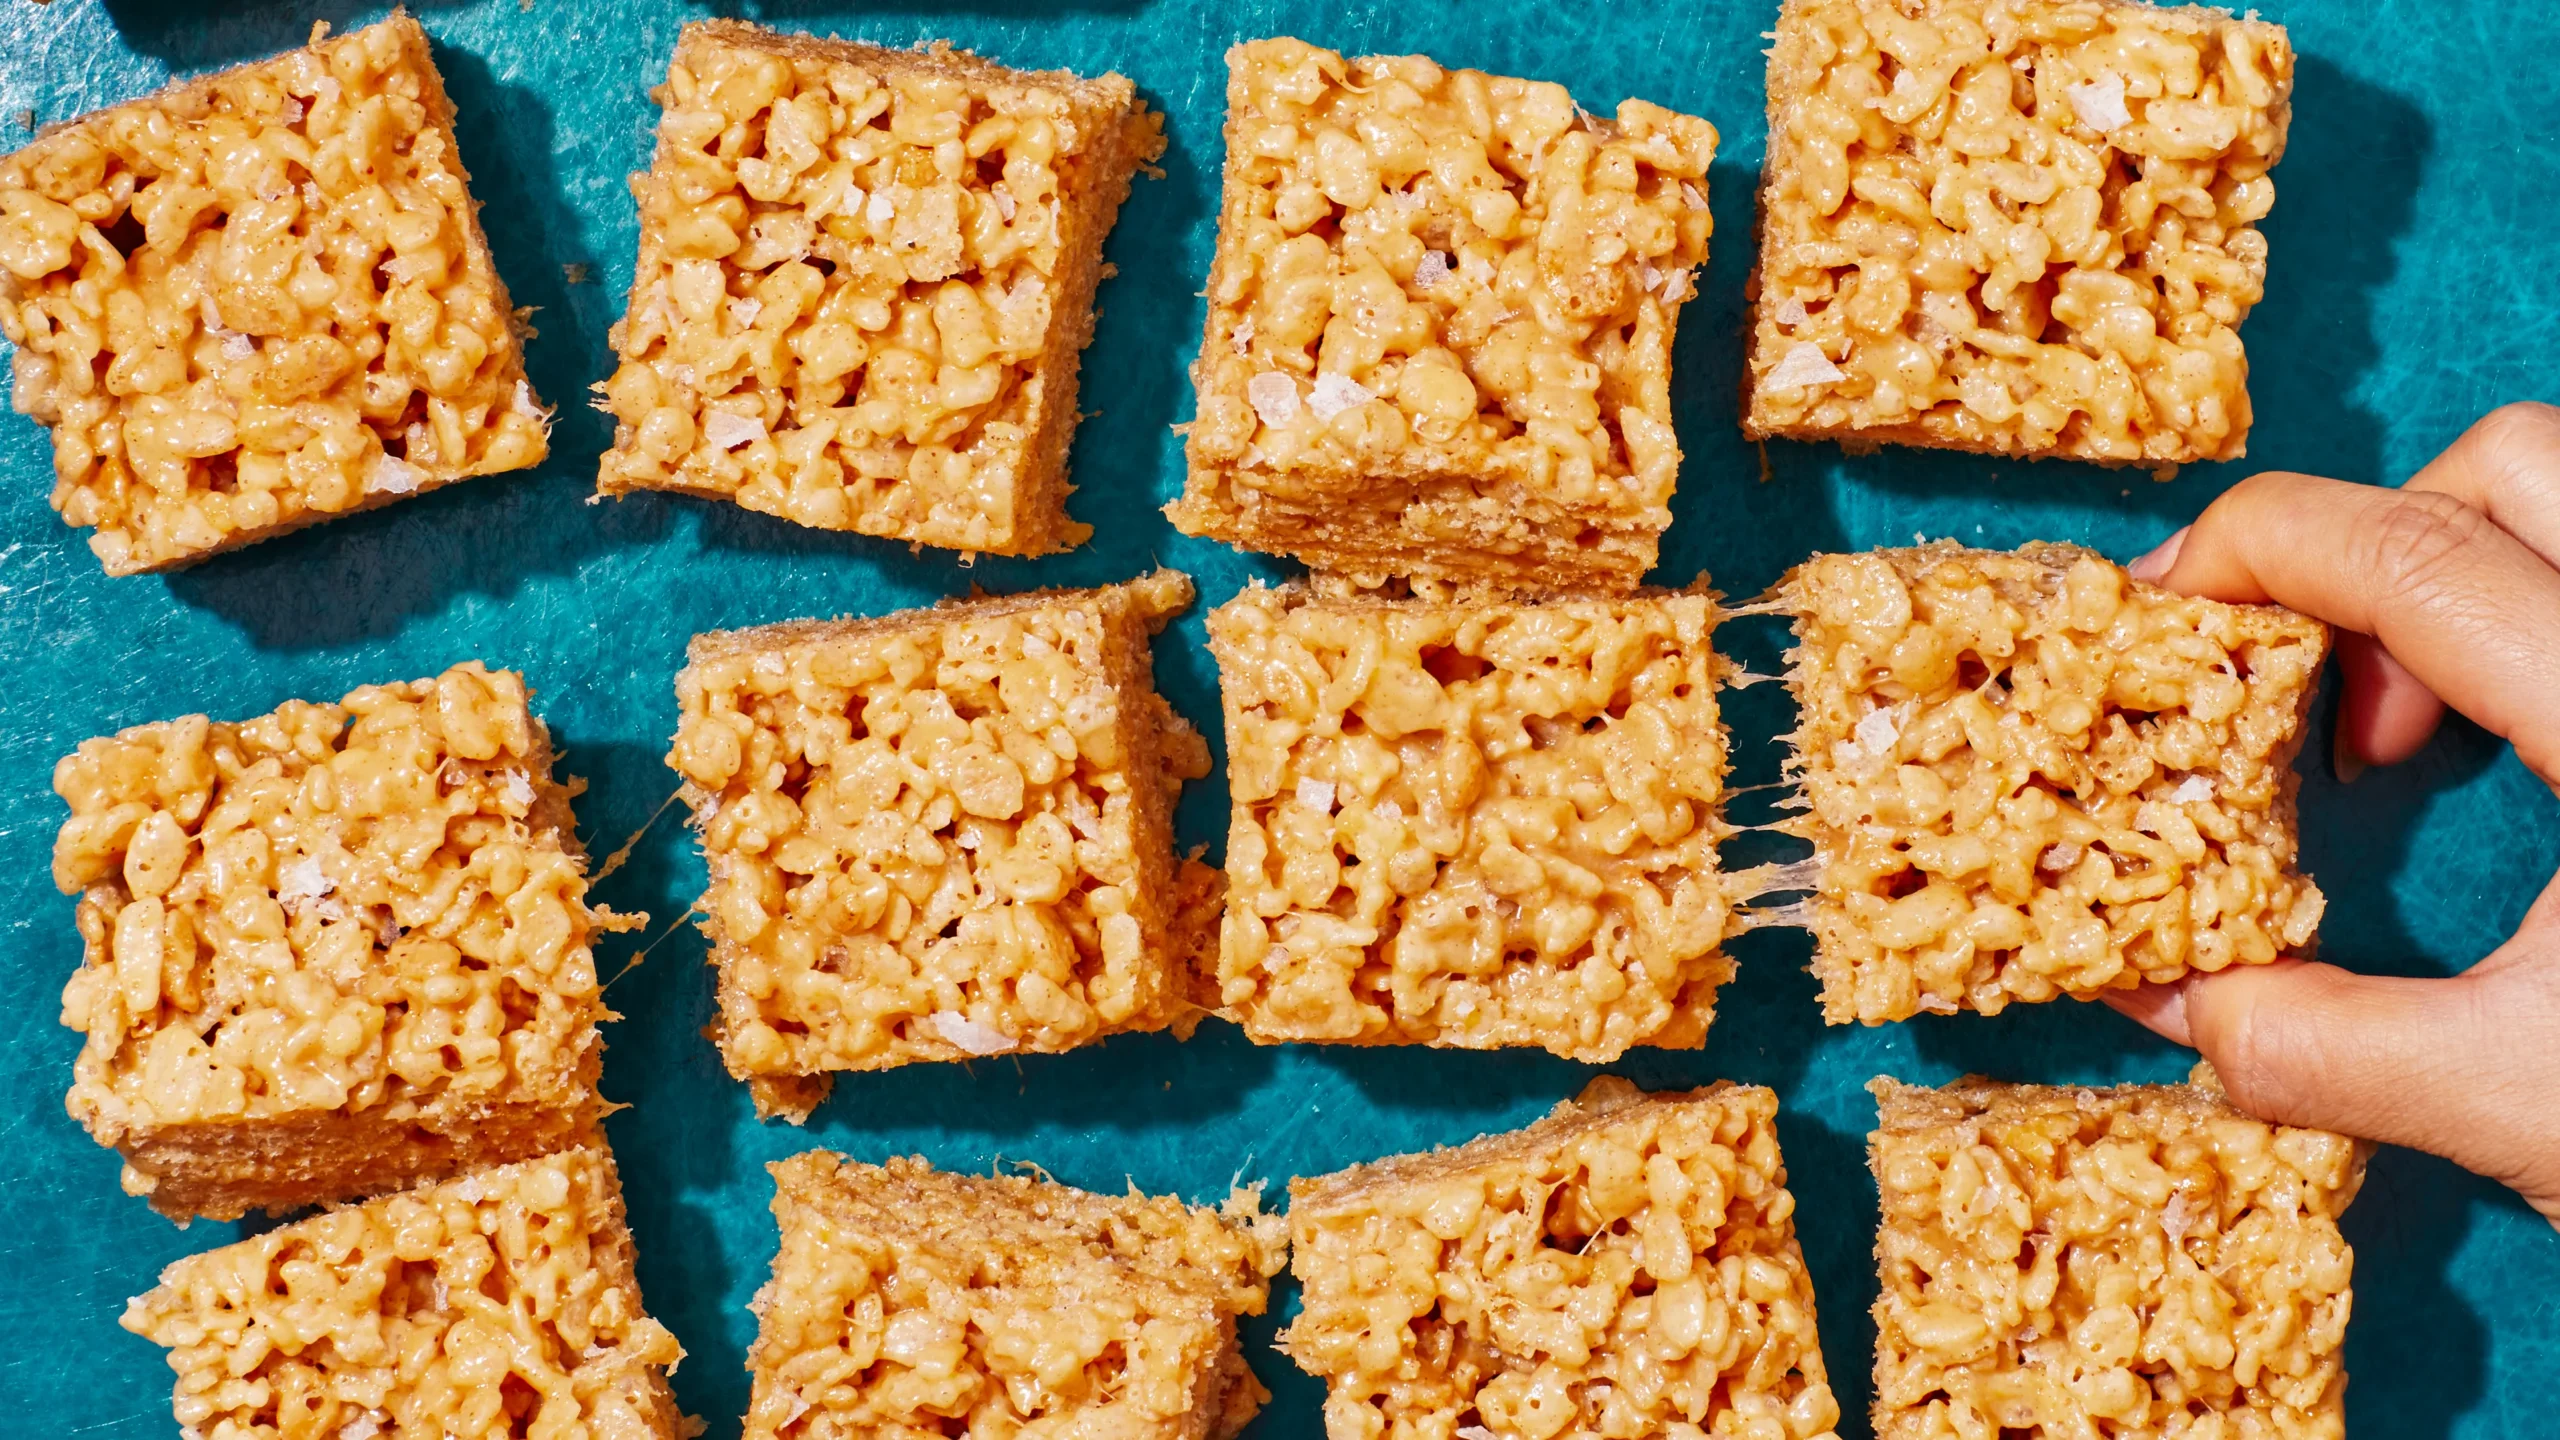
Step 7: Shape into Bites

Remove the chilled mixture from the refrigerator.
Using your hands or a small scoop, portion the mixture into small, bite-sized pieces.
Roll each portion into a ball for uniformity.
Place the shaped bites on a tray lined with parchment paper.
Step 8: Serve or Store

Arrange the finished bites on a serving plate for immediate consumption.
Alternatively, store them in an airtight container in the refrigerator.
These snacks can be enjoyed immediately or kept for up to a week.
Ensure they are stored properly to maintain freshness and texture.
Critical Timing and Temperature Guide
Chilling Process: Chill for at least 30 minutes in the refrigerator. Look for a firm texture that holds shape when rolled. Avoid over-chilling as it may make the mixture too hard to shape.
Mixing Technique: Mix ingredients until smooth and well combined. If the mixture appears too dry, add a splash of milk. Avoid over-mixing, which can lead to a dense texture.
Storage Conditions: Store in a cool, dry place in an airtight container. Look for any signs of moisture or discoloration. Avoid storing in a warm environment as this may cause the snacks to soften.
Pro Tips for Irresistible Peanut Butter
• Ingredient Selection: Use high-quality, natural peanut butter without added sugars or oils for the best flavor.
• Preparation Secret: Adding a pinch of salt enhances the sweetness and depth of flavor in the snacks.
• Temperature Management: Ensure ingredients are at room temperature before mixing for better consistency.
• Texture Enhancement: Gently fold ingredients to incorporate air and maintain a light texture.
• Flavor Layering: Toast nuts lightly before adding to enhance their flavor.
• Make-Ahead Strategies: Prepare the mixture a day in advance and store in the fridge for an easy grab-and-go snack.
• Restaurant-Quality Finishing Touches: Drizzle melted chocolate over the snacks for a professional look.
• Equipment Optimization: Use a small cookie scoop to portion the bites evenly and save time.
Troubleshooting Common Issues
• Texture Too Sticky: This can occur if the mixture is not chilled long enough. Chill for an additional 15 minutes and try shaping again.
• Flavors Unbalanced: If the snacks are too sweet, reduce the amount of honey or add a pinch of salt to balance.
• Snacks Falling Apart: Ensure enough binding ingredients like honey are used. If needed, add a bit more and mix thoroughly.
• Mixture Too Dry: Add a small amount of milk or water to moisten the mixture if it’s too dry to shape.
• Overpowering Peanut Flavor: Balance by adding more oats or mix-ins to mellow the peanut taste.
• Unappealing Appearance: Roll the bites evenly and consider adding a garnish, such as a sprinkle of cocoa powder, for visual appeal.
Variations and Regional Differences
• Asian-Style Variation: Incorporate sesame seeds and a hint of soy sauce for a savory twist on the classic recipe.
• Latin American Variation: Add cinnamon and a touch of chili powder for a spiced version of the snack.
• Mediterranean Variation: Use tahini instead of peanut butter and add chopped dates for sweetness.
• European Variation: Incorporate hazelnut spread and chopped hazelnuts for a Nutella-inspired twist.
Food Science Behind the Recipe
• Emulsification: The combination of fat and liquid in peanut butter and honey creates an emulsion that helps bind the ingredients together.
• Maillard Reaction: Toasting nuts triggers the Maillard Reaction, enhancing their flavor and aroma.
• Hydration: Rolled oats absorb moisture from the other ingredients, contributing to the overall texture and structure of the snacks.
Frequently Asked Questions
What’s the most common mistake people make when preparing peanut butter snacks? Over-mixing the ingredients, which can lead to a dense and heavy texture. Mix just until combined for the best results.
Can I use crunchy peanut butter instead of creamy? Yes, crunchy peanut butter can add a delightful texture to the snacks, just be sure to adjust other ingredients as needed.
How do I prevent the snacks from sticking together? Chill the snacks before storing, and separate layers with parchment paper.
Are there any alternatives to honey as a sweetener? Maple syrup or agave nectar can be used as alternatives, though they may slightly alter the flavor.
Can these snacks be frozen? Yes, they can be frozen for up to 3 months. Thaw in the refrigerator before consuming.
What can I add for extra protein? Consider adding protein powder or chia seeds to boost the protein content.
How do I make the snacks gluten-free? Ensure that the oats used are certified gluten-free.
Serving and Presentation Guide
• Traditional Presentation: Serve on a rustic wooden board, garnished with a sprinkle of oats or chopped nuts.
• Modern Presentation: Arrange on a sleek, white platter with a drizzle of dark chocolate for contrast.
• Casual Presentation: Place in a mason jar or clear container for an easy, on-the-go snack option.
• Kids’ Presentation: Shape into fun, bite-sized animals or shapes using molds to make them appealing to children.
Conclusion
Creating irresistible peanut butter snacks is a rewarding experience that combines simplicity with flavor.
These snacks offer a delightful blend of taste and nutrition, perfect for any occasion.
I hope you enjoy making and sharing these bites as much as I do.
Happy snacking!